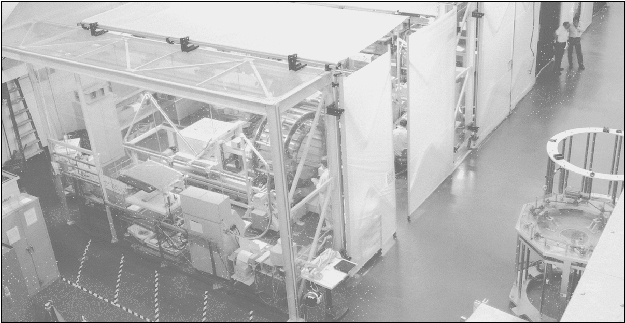
Finally, the optical element is placed on a computer-controlled polishing machine (Fig. 4), and tools of different sizes are used with their associated run files to reduce the surface errors. These small tools are not effective in reducing errors with scale sizes smaller than their own dimensions, but fortunately such small-scale errors can be attacked efficiently with large smoothing laps, and these are used to reduce mid and high frequency surface errors. Typical polishing cycle times are of order two or three weeks, so the total cycle time is about a month. An optic now requires about four grinding cycles and seven polishing cycles to reach an acceptable tolerance.
This activity occupies an area somewhat over 2000 square meters,
or about the size of a football field; the
metrology is performed in temperature controlled `blue boxes' which
are about seven by eight meters by five meters high. The seemingly
simple problems of just handling the glass, moving it from one place
to another, changing from the constraining support hardware used for
polishing to the strain-free PMM support used during measurement, etc., all
require careful planning, auxiliary equipment, and time.

Figure 4. The largest paraboloid is shown in the automatic grinding and polishing machine at Hughes Danbury Optical Systems, Inc. The tent-like structures within the building help to provide humidity control. [Photo courtesy of Hughes Danbury Optical Systems, Inc]
Typically, greater difficulties are experienced near boundaries in the
polishing process, and our original plan was to polish mirror elements
about 75 mm overlength at each end, and then remove the excess
material. We knew that residual stresses smaller than our ability to
measure could introduce significant distortions, but we hoped that the
symmetry of the annealing process at Schott would result in benign
internal stresses. P1 and H1 were polished as a process
demonstration, and tested as the first verification engineering test article
(VETA-1) before this extra length was removed. The ends were removed
after the successful X-ray demonstration tests ( arc seconds
FWHM), and unfortunately unacceptable distortions were found to
be introduced. We then changed the plan to correct P1 and H1, and to
cut the other optical elements while the residual errors remained
larger than the expected end cut deformations. So far four of the six
remaining elements have been cut; of the three which have been
measured, two showed little distortion, whereas the third showed
distortions which would be unacceptable. The result of cutting early
will be a slight degradation of the outer
% of the mirror
elements.
The final polishing cycle on P1 has just begun, and should be complete by the end of June. Final metrology, shipping, etc., should result in this mirror element being delivered by mid August. All mirror elements should be complete by May, 1995.
----------------